

When I started building Calyqen and Meriqen, I did not understand how all the parts of a website worked together.
I only knew the problems I wanted to solve.
- Calyqen came from seeing how difficult and time-consuming the job search could be from my mom.
- Meriqen came from seeing how confusing it can be for students to find and organize scholarships and no tool tells you the next step. How to make decision between multiple schools and compare them.
I used Claude to help me plan and Claude Code to help me build. But it was not as simple as telling AI, “Make my app.”
I still had to explain my ideas, make decisions, connect different services, test everything, and fix a lot of problems.
I started with the idea, not the code
First, I created a Claude Project and explained the whole idea.
Then I asked Claude to turn it into clear requirements:
- Who will use the website?
- What problem are they facing?
- What should each feature do?
- What information will the feature need?
- What should the AI never do?
- How will I know if it works?
This gave Claude Code a clearer plan to follow.
I learned that unclear instructions usually create unclear results. Spending more time on the requirements saved me time later.
What the apps are made of, in normal English
Most of both websites are written in TypeScript. It is similar to JavaScript, but it can catch more mistakes before they reach users.
A few other tools help with different jobs:
- React and Next.js turn the code into the pages, forms, dashboards, and buttons people use.
- Tailwind CSS controls the colors, spacing, text, cards, and overall appearance.
- SQL organizes the information stored in Supabase. It also helps keep each person’s account separate and protected.
- A small amount of regular JavaScript helps with browser and device notifications.
- Markdown keeps pages such as the Privacy Policy and Terms easier to update.
- YAML gives GitHub instructions about which automatic checks to run before a change is released.
I did not learn all of this at once. I learned each part when I reached a problem that required it.
The online services I connected
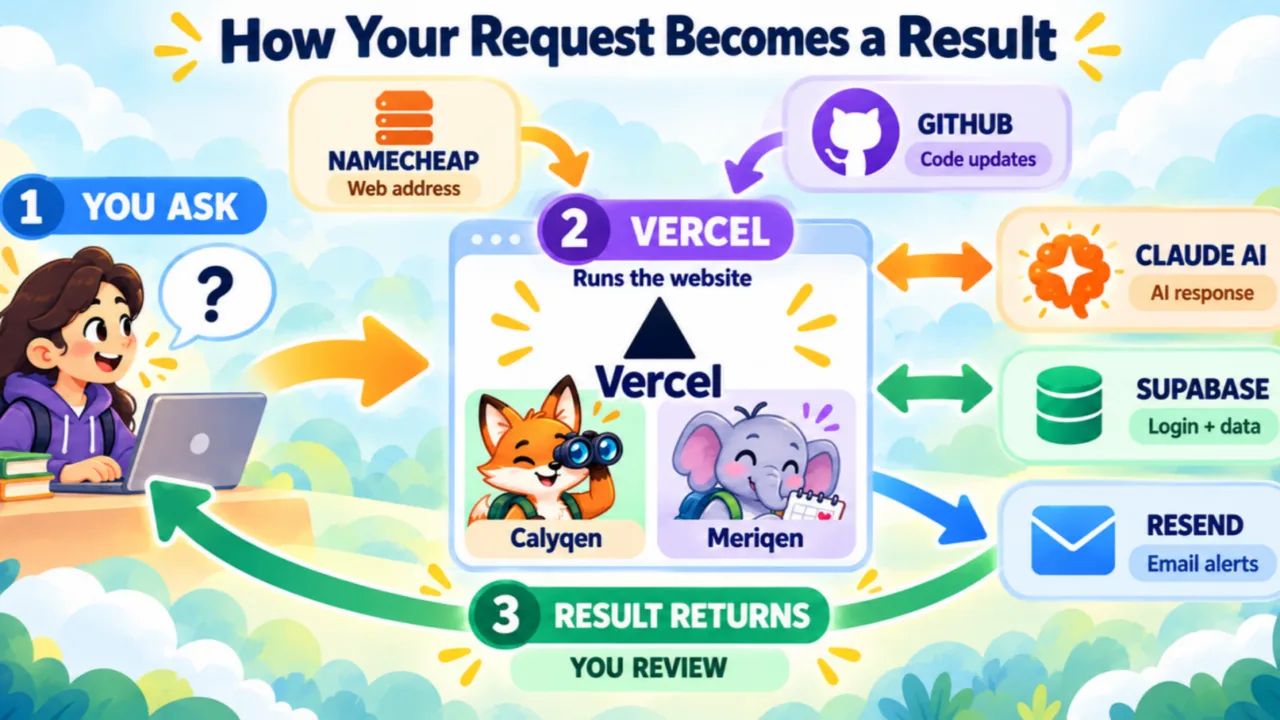
The websites also depend on several services working together:
- GitHub stores the code and keeps a history of changes.
- Vercel takes that code and puts the websites online.
- Supabase handles user accounts and saves information.
- Claude AI produces suggestions and explanations when a user asks for help.
- Resend sends email reminders and notifications.
- Namecheap is where I purchased and connected the domain names.
- Environment variables are private digital keys that allow these services to communicate without placing passwords inside the code.
Creating accounts was the easy part. Understanding how everything connected took much longer.
How the closed loop works
Even though many tools are working behind the scenes, the experience for the user should be simple.
Here is the loop:
- A person opens Calyqen or Meriqen and chooses a task.
- The website collects only the information needed for that task.
- It prepares a focused request and sends it to Claude AI.
- Claude returns a suggested answer or explanation.
- The website checks the response against its rules and displays it.
- The user reviews it, changes it, approves it, or asks another question.
Then the loop can begin again.
The user is always the final decision-maker.
For example, Calyqen should not add job experience that a person does not actually have. Meriqen can help students find and organize scholarships, but it should not replace their personal voice.
AI suggests. The website follows its rules. The person decides.
Testing the app in two different ways
One of my biggest lessons was that AI saying “done” does not mean the feature is actually done.
I added two types of automatic testing:
- Vitest checks the smaller pieces of the code.
- Playwright opens the real website and clicks through it like a user would.
Playwright can check whether someone can sign in, open a page, fill out a form, and complete a task.
I also learned about regression testing. That sounds complicated, but the idea is simple:
After changing one part of the website, check that the older parts still work.
Sometimes I fixed one problem and accidentally created another. Regression testing helped me catch that.
My build-and-test process
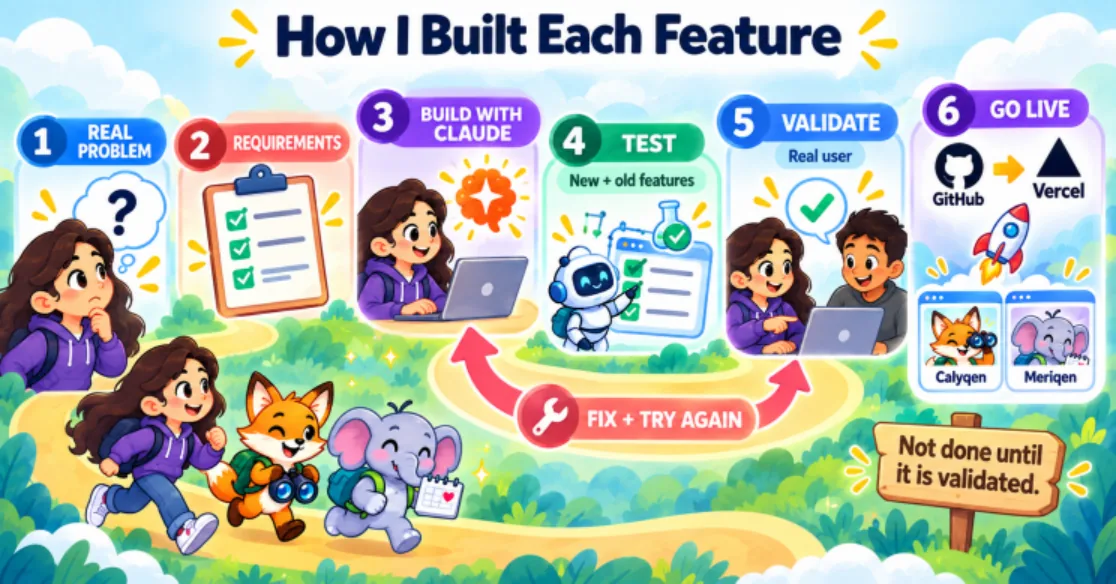
My process slowly became:
- Write the requirements first.
- Save the current version in GitHub.
- Build one part at a time.
- Test it on a preview website.
- Ask Claude Code to validate every requirement.
- Run the automatic tests.
- Check that older features still work.
- Review any errors.
- Let a real person try it (me).
- Only then release the change.
I also learned how to read error messages and run simple SQL questions against the database. That helped me understand what information was saved and where something may have gone wrong.
The prompt that saved me time
At first, I sometimes needed 10 or 15 short prompts to finish one feature.
Later, I began giving Claude Code a more complete instruction:
Before coding, read the current project and requirements. Find any missing information. Answer what you can from the existing context, and ask only questions that truly stop the work. Make a complete plan, build the feature, test it, run regression tests, and validate it against every requirement. Tell me what changed, what passed, and what is still uncertain. Do not say “done” until you have checked the result.
This reduced a lot of unnecessary back-and-forth.
I still checked the work. The better prompt just helped Claude understand the full job before starting.
How I chose an AI model
I kept this part simple:
- For the first setup or a large, difficult feature, I used a more powerful reasoning model.
- For smaller changes and fixes, I could use a faster model.
- Clear requirements still mattered more than constantly changing models.
Even the most powerful model struggles when it does not understand what you want.
What I learned
- Start with a real problem, not only an app idea.
- Write the requirements before building.
- Work on one feature at a time.
- Keep private keys out of the code.
- Save small changes so you can go back.
- Ask “why” when an answer does not seem right.
- Use the word validate, not only “check.”
- Test old features after adding something new.
- Do not trust “done” without proof.
- Let real people use the product.
- Keep the person, not the AI, in control.
I am still learning. I definitely did not understand most of these terms when I began.
That is one reason I wanted to share this.
You do not need to understand the whole system on your first day. Start with one real problem. Write down what a good result should look like. Connect one piece at a time and test every step.
That is how Calyqen and Meriqen slowly went from ideas in my head to websites people can actually use.
If you are trying to build your first app, which part feels the most confusing?